Connect all the grounds, including to each switch.
Connect all the neutrals. If any of your switches are “smart” devices, they may also need a neutral connection.
Connect the PANEL hot wire to the common terminal on switch 1.
Connect the LIGHT hot wire to the common terminal of switch 2.
Connect the switches using the TRAVELER (14/3) black and red wires (in any order).
That’s it, you’re done. The black/red wires in the TRAVELER ensure that no matter which orientation switch 1 is in, power is able to reach switch 2 (for it to also have a say in the matter). The neutral provides the normal return path to the panel, and the ground provides a fault path.
But if you’re like me, you’re probably adding a 3-way switch into an existing circuit, which probably looks like this (or wants to):
PANEL to switch 1 (existing)
LIGHT to switch 1 (existing)
Switch 1 to switch 2 (TRAVELER) (14/3)
The trick is remembering “common in, common out”. Power should go IN one of the switches and OUT the other one. This is the same principle regardless of how your switches/wires are physically arranged.
Run your 14/3 traveler over to the new switch box and sharpie or tape the remaining white wire at both ends (so you don’t accidentally bundle it in with the neutrals). Connect the blacks/reds/grounds as normal on both switches, and connect the sharpied/taped white to the common terminal on the switch 2. Back at switch 1, take note of whether its common terminal is connected to the panel or the light, and connect the sharpied/taped white to the opposite. I.e. if switch 1 common feeds the light, connect the white traveler to the panel hot by itself (your new switch is now “switch 1” in the original layout). If switch 1 common is connected to the panel wire, then connect the white traveler to the light hot by itself.
Nearly every cell phone these days is capable of livestreaming a church service using the built-in camera and microphone. If you want to step up your game, however, you may need to invest in some technology. Some of the equipment you will need is listed below.
Video
A digital camera with HDMI output. This is what you will capture the scene with. While most DSLR cameras have an HDMI output, and increasingly so do many point and click cameras, these devices are more geared towards taking still photos. Your best bet is to use a digital camcorder purpose-built for video. You will want a camera that can output at least 1080p/30 (a resolution of 1920×1080 pixels at 30 frames per second). While a 4K-capable camera may be tempting (and within budget), it’s not a requirement, and the recordings will take that much more space on your hard drive.
A quality HDMI cable to transmit the captured video from the camera to a computer. My recommendation is to get a good cable, and not the cheapy one from AmazonBasics. Additional cables might be needed for video distribution (e.g. for additional computer monitors, out to a TV in an adjacent room, etc). If you need longer than ~30′, look into converting the signal to SDI or NDI.
While most computers can output HDMI video, you will need an HDMI to USB capture device to input the video signal. This will make the video source appear more or less like a webcam to the computer’s operating system.
Audio
You will need microphones to pick up sounds from the pulpit, the singers/choir, and even the congregation. If you only use one microphone, that can run straight into the audio interface, but for multiple microphones, a multi-channel audio mixer is a must. You will need a channel for each voice or instrument you want to add into the mix. Any instrument or voice that is not mic’d will not make it into the livestream, so don’t forget to mic instruments that don’t normally need additional amplification to be heard in the room (e.g. drums).
XLR cables pass the audio signal from the microphone or instrument into the audio mixer, as well as from the mixer output to the computer. You will need a cable for each microphone/instrument. Unless it has an XLR output, most instruments that get plugged in will need a direct input (DI) box to convert the signal from an unbalanced cable with a 1/4″ headphone plug to an XLR balanced cable. Balanced cables can travel much longer as they are less susceptible to interference.
You will need a USB audio interface to input the audio source into the computer. This performs essentially the same function for sound that the HDMI capture device does for video.
Computer equipment
You will need a decent computer to composite, render, and encode the stream. Most computers made in the last several years should be able to handle live rendering of a 1080p/30 stream, especially if they have a video card with hardware encoding. If not, the main processor and memory will have to perform the task, which can make the rest of the computer sluggish. I recommend a Core i7 processor, 16gb memory, and an SSD drive for storage.
Extra video monitors always come in handy. You may want one facing forwards to show people what the camera is looking at or what the stream video looks like going out. And additional desktop real estate on the computer allows you to have more windows visible without having to switch between them.
Software-wise, OBS Studio is free software and is available for Mac, Windows, and Linux, is easy to use, and is used by millions of users. Using OBS, you can create scenes using various audio/video sources and switch between them as needed during the stream. For instance, you might have a title/end card scene that shows a logo against a plain background. Another scene might be a full-screen view from the camera, or maybe a split-screen view of the pulpit on one side with slides on the other. During the stream, OBS will render the scene at the selected resolution and frame rate, and output it as a stream to a streaming provider or saved as a recording (or both). There is a Discord server frequented by many knowledgeable people for support help if needed.
A streaming provider is needed to distribute your video to the masses. YouTube, Twitch, and Vimeo are all popular options. Keep in mind that some platforms have restrictions on livestreaming, such as minimum subscriber counts.
This tutorial will walk through the basics of how to create a Progressive Web Application using Vue.js and the Vue CLI. The full project is available on GitHub.
Note: I won’t be explaining any basic Vue.js concepts in depth, as this tutorial assumes you’re already somewhat familiar with the framework.
Let’s jump right in. If you don’t have it already, install Vue CLI first:
~/code$ yarn global add @vue/cli
Next, let’s create a new project:
~/code$ vue create my-pwa-app
Vue CLI defaults to Babel and Linter/Formatter (eslint) support only, but for this project we will need PWA support as well. Choose Manually select features from the next menu and select Progressive Web Application (PWA) Support as well.
Answer the other questions by hitting Enter and sit back while Vue CLI scaffolds out your initial project.
If you already have a Vue project created, you can simply add PWA support using vue add pwa instead.
Once it completes, open up the project folder using your preferred text editor and let’s take a look.
As you can see, Vue CLI has created a handful of files and folders. Let’s break down some important ones.
/public is where all of our static files will go. Anything placed in this directory will be available as-is without undergoing any transformation or optimization by the build process.
/public/index.html is what the browser will look for when it loads
/src is where all of the actual code for getting stuff done happens. During the build process, these files get packaged up and optimized.
/src/main.js is the entrypoint for the app. It takes care of initializing Vue, specifying the base template (App.vue), and registering the service worker.
Not yet shown is the /dist folder, which is (re)created each time you build your project. When it gets time to actually deploy our application in production, we’re going to want to point our web root to this folder.
Fire up a live server and open up http://localhost:8080/ in your browser to see what it looks like. From within your project folder:
~/code/my-pwa-app$ yarn serve
In addition to displaying a large Vue logo, it also displays content generated by the HelloWorld component in /src/components. Great!
Let’s open up Chrome Developer tools and click over to the Audits tab. If we run an audit, Lighthouse will show that we need to do a little bit more.
One thing to note is that we’re not viewing a production build. Since we’re using yarn serve, assets are compiled on the fly and the browser window is updated each time we save a change to the code. This is also the reason why our Performance score is so dismally low, and why the Progressive Web App category is grayed out. Let’s switch over to a production build and see if anything changes. Stop the live server with Ctrl+C and let’s build our project for real.
You’ll notice serve defaults to using port 5000, so let’s visit the new address in the browser and re-run the audit:
That’s a bit better. As you can see, the PWA portion is no longer grayed out. Congratulations, you’ve just built your first Progressive Web Application. 👏
But we’ve only scratched the surface. Let’s look at what actually makes a PWA.
First, you need a manifest.json. Like other static assets, this JSON file normally lives in /public and specifies the name of the app, theme colors, icons, and a litany of other app-specific things. However since we used Vue CLI to scaffold our project, it is currently being (re)generated each time we build. To specify these values, we’ll need to create a vue.config.js (which we’ll get to later).
Secondly, your PWA needs a service worker. Service workers function as the backbone for the app. They can check for updates, manage cached data, and almost anything else your app needs to do in the background. To use a service worker, it has to be registered, which Vue CLI has already taken care of. Let’s look at /src/registerServiceWorker.js:
/* eslint-disable no-console */

import { register } from 'register-service-worker'

if (process.env.NODE_ENV === 'production') {
  register(`${process.env.BASE_URL}service-worker.js`, {
    ready () {
      console.log(
        'App is being served from cache by a service worker.\n' +
        'For more details, visit https://goo.gl/AFskqB'
      )
    },
    registered () {
      console.log('Service worker has been registered.')
    },
    cached () {
      console.log('Content has been cached for offline use.')
    },
    updatefound () {
      console.log('New content is downloading.')
    },
    updated () {
      console.log('New content is available; please refresh.')
    },
    offline () {
      console.log('No internet connection found. App is running in offline mode.')
    },
    error (error) {
      console.error('Error during service worker registration:', error)
    }
  })
}
As you can see, this script makes use of the register-service-worker package, which performs the entire SW registration process and emits a handful of events which we can listen for and handle here. Let’s head back to our production build in the browser and check out the console messages that our service worker is already generating.
Right off the bat, we can see two lines that indicate our service worker is doing something, corresponding to the ready() and registered() events.
Success! In this lesson, we’ve learned how to use Vue CLI to scaffold out a basic Progressive Web Application, explored the various files and folders it creates, and learned how to run a production build process.
But you might be thinking, what’s so special about a PWA? Well, as the name implies, it’s an app. And apps can be installed so that they live on the device and not inside the browser.
We’ll tackle this step in the next article, “Building a PWA with Vue.js from scratch (part 2)”.
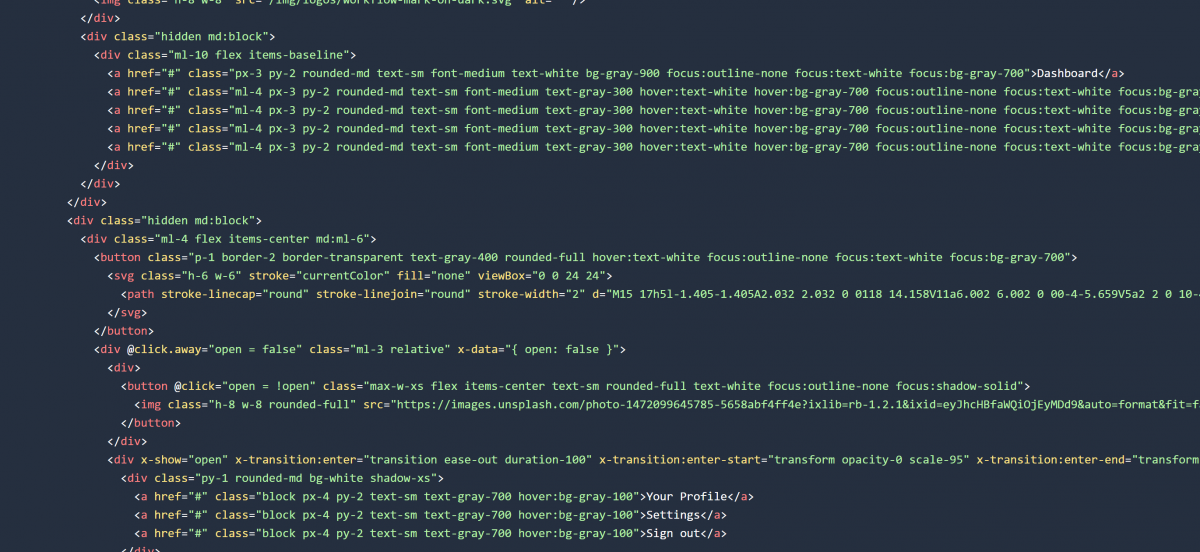
If you’re like me, you’re excited about the new Tailwind UI from the makers of the popular utility-driven CSS framework Tailwind CSS.
Unfortunately (and honestly I don’t blame them), the makers chose Alpine.js for its simplicity and declarative coding style. This presents a small issue for those of us who are used to using Vue.
All those x- attributes are Alpine.js statements. We’re interested in the ones that start x-transition as they define which classes to use during which stage in the transition. Notice that Alpine.js transitions are declared on the element itself, in this case the root <div>.
Fortunately, Vue uses a similar syntax so it’s easy enough to understand, but the implementation of transitions is handled a little differently, requiring a <transition> element as wrapper. Here’s the exact same code using Vue:
As you can see, I moved the transition attributes up to the <transition> element and dropped the x-transition: prefixes. I also had to rewrite the attribute names, as the two frameworks use different naming conventions:
Transition
Alpine.js
Vue.js
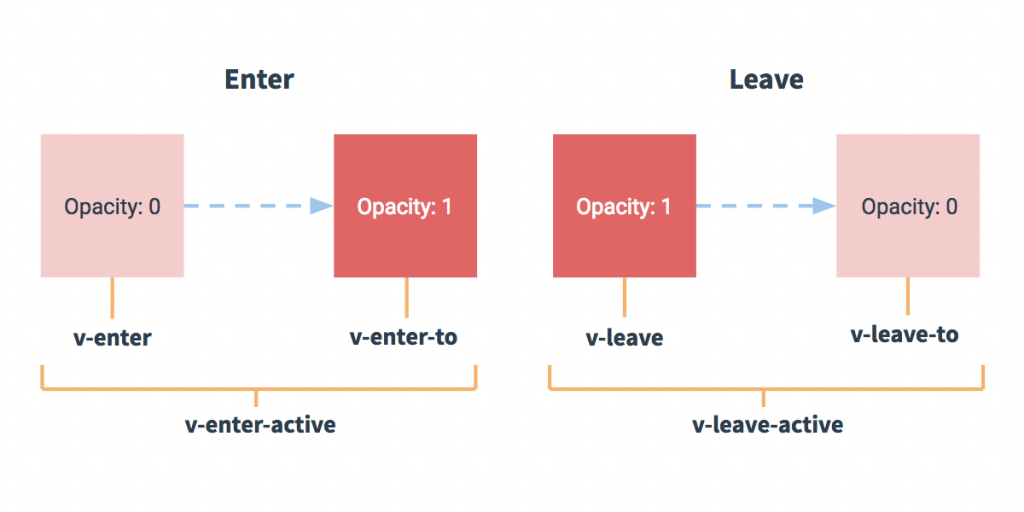
entering (start to finish)
x-transition:enter
enter-active-class
begin entering
x-transition:enter-start
enter-class
finish entering
x-transition:enter-end
enter-to-class
leaving (start to finish)
x-transition:leave
leave-active-class
begin leaving
x-transition:leave-start
leave-class
finish leaving
x-transition:leave-end
leave-to-class
If your Vue transitions aren’t working, make sure you moved them into a parent <transition> element.
For further information on these states, check out either the Vue or Alpine.js documentation.
Reusing transitions
Of course, we might like to re-use those transitions in various parts of our app. Refactoring involves assigning a name to the <transition> element, and moving the transition classes to your stylesheet prefixed with that name. We’ll call this transition “fade”.
In your main stylesheet, add in the transition classes prefixed with fade-. If you use a different name for your transition, prefix your classes with that instead. Note that we can combine several classes as well. Tailwind makes it easy with the @apply directive. This block should be added directly after @tailwind components in your main stylesheet.
So I’ve been learning the Laravel PHP framework for the better part of a year now and integrating it into my professional repertoire little by little. At the same time, I’ve been operating a small company called EPIXIAN with a handful of loyal customers. Part of doing this entailed running a webserver, in part to host my customers’ projects, but mostly to host staging environments and demo sites when I need input from the customer or to make a sale. And to be frank, the hosting income wasn’t really offsetting the amount of time and energy, or actual dollars the server was costing me.
The server itself was being rented from Amazon Web Services, and on top of that, the Plesk software I was using to provision accounts was costing even more each month. But people don’t want to DIY websites anymore it seems, and it was pointless to pay for a service that enabled people to go in and manage their own sites, when most of my customers weren’t interested.
I stumbled across Laravel Forge, which to be honest, looks sleeker and more kitted out from their website than it really is. The documentation is pretty weak, but it does what I want, and the sites themselves seem to be peppier. I even switched back to DigitalOcean in the process.
So there you go. This site, and many others, got, or are getting migrated over to a Forge-provisioned server, and my administration overhead just got a lot smaller as a result.
In the year 2000, I began patronizing one of the early pioneers of shared webhosting, PHPWebHosting. My particular server was named “cub”. This was where I learned PHP and MySQL, cutting my teeth building homebrew blogging platform with a name I can’t remember.
When I joined the Army in 2004, my blogging pretty much went away, and I didn’t even own a computer for over a year after that. I stopped renewing my domain name sometime later. Not sure exactly why I kept paying them, but there you go.
In 2015, I moved the site over to DigitalOcean. For one reason, $10/mo (which was what I was paying PHPWebHosting) gave me a WordPress instance, root access to the file system, and it wasn’t a shared hosting environment. With the server based in San Francisco and me in Korea, I could even install a personal VPN on it and was able to masquerade as an American when trying to bypass country-wide restrictions on apps in the Android app marketplace.
In 2017, I started using AWS as a hobby, and launched a handful of EC2 instances to help me learn the ins and outs of their API. One instance ran a script that launched other instances by itself to distribute a batch processing workload that never saw production. A year later, I would decide to launch my own business, and used AWS to run a Plesk server that would handle multiple websites.
Sometime in early 2018, the DigitalOcean droplet I was using updated to a newer version of Ubuntu. I never did figure out how or why exactly it happened, but somehow the file system would become unmounted and refused to remount automatically. It ended up taking a number of support tickets to iron out the problem, which seemed to be linked to the UUID of the physical drive.
After that, the database server refused to upgrade. I’m still not sure why or how it occurred, but today I finally figured out the cause: AppArmor was the culprit, denying access to numerous startup files required by MySQL. Once I got the database up and running, I dumped its contents and imported them into a WordPress database running on the Plesk server, and destroyed the old DO droplet.
So here we are. My personal website is now being hosted by my business.
If you are involved in the worship/music ministry at your church, you may find this session helpful and informative. New Life Presbyterian Church pastor Mark Moser elaborates on why New Life worships the way it does.
A friend of mine shared this with me, and I found it useful enough, at least as a minimum, for considering new songs to add into one’s repertoire.
[T]he fault lies partly with the worship leaders who choose drivel and, by force of personality and microphone, force the congregation to sing it; and, even more culpably, with the elders who say and do nothing about it, preferring a smorgasbord of new and catchy melodies to the weighty and substantial songs which will actually teach sound doctrine to those who love Jesus, and preach the gospel to those who don’t.
When you come into a community, into a Christian community […] it’s a human instinct to look around and, if you kind of like the community and you think you might want to be a part of it, there’s an instinct to conform a little bit to the way things are done. How do we dress around here? Okay, I see a pattern, I can do that. I’m going to church now, I’ve gotta get my hair cut. I’ve gotta get a Bible that looks like that guy’s Bible. I gotta master the vocabulary here and learn to talk the talk a little bit.
What is it at [your church] (external culture things)? Maybe I’ve gotta learn to drink better coffee in the morning. Maybe I need to learn to drink better beer at night. I’m not completely joking. That’s not for everybody – the coffee and beer thing – and it cannot be what defines us.
Do not ever think that belonging to [a Christian] community means that you need to change your external habits – in regard to unimportant things. Because in the church, we should have blue highlights and tattoos. We should have polo shirts and khakis. We should have sundresses and t-shirts, skinny jeans and mom jeans, goatees and cornrows, long hair, short hair. The church should contain every kind of person, but every kind of person enthralled and captured by the same Jesus, our living Lord. Because whenever the church is identifiable by its cultural externals, we’re done, we’re done.
So if you come to church, I want your drive to be, I’ve got to know Jesus better. He has gotten my attention and I need to go further in relationship with him. And then, the really important things flow from there, like loving people, for instance. So […] if we can be characterized by love for Jesus, and love for people, we’ll be doing alright. Amen? Amen.
“We don’t come to church, to be a church. We come to Christ, and we are built up as a church. If we come to church just to be with another, one another is all we’ll get. And it isn’t enough. Inevitably, our hearts will grow empty, and then angry. If we put community first, we will destroy community. But if we come to first and submit ourselves to him and draw life from him, community
gets traction.” – C.S. Lewis